Both effects are our own free releases. This is a guide to their controls and intended workflows, not an independent review or a promise that every preset improves every source. JDMeet Phantom processes four frequency bands separately. JDMeet Crusher combines Tube and Mech distortion, a resonant filter and compression in a compact channel effect.
One frequency range, or the whole channel?
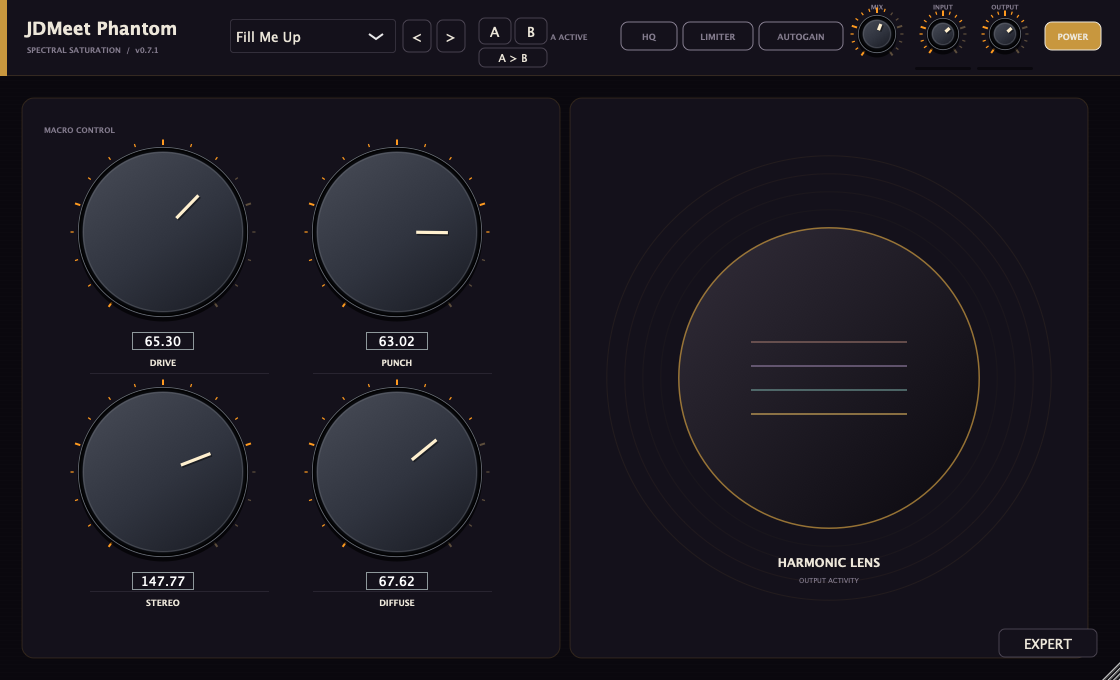
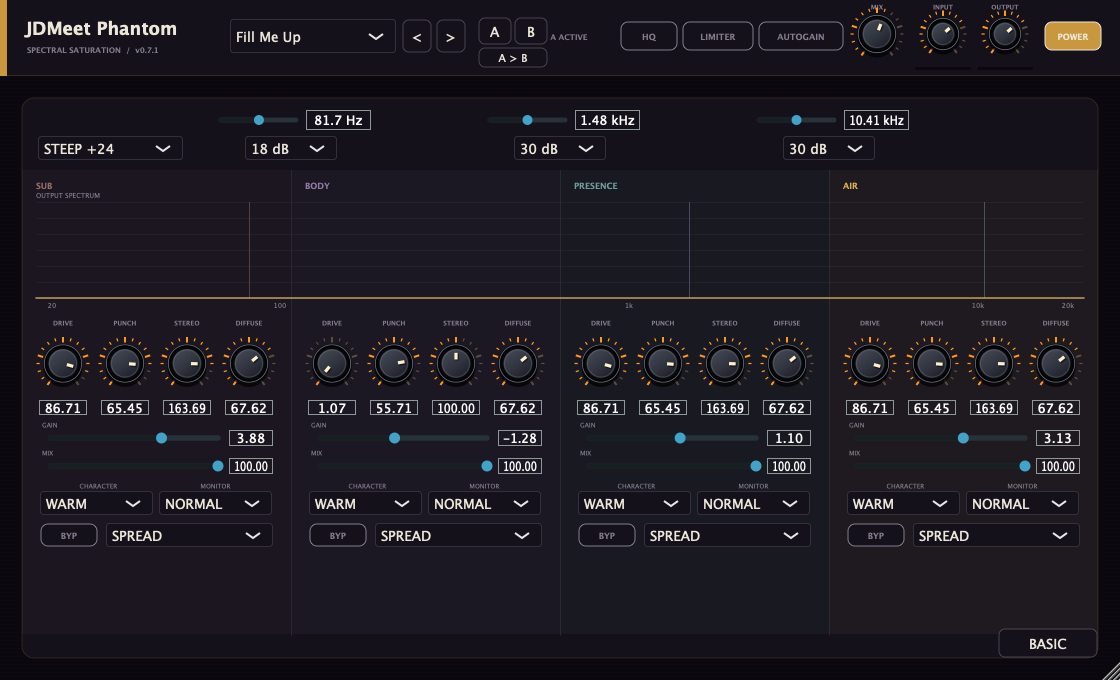
Choose Phantom when the sub, body, presence and air need different treatment. In Expert mode you can set crossovers, solo a band and change its Drive, Punch, Stereo, Diffuse, gain and mix independently. Basic offers four macro controls for quicker changes across the band profile. The spectrum is a listening aid, not a target curve to flatten.
Choose Crusher when you want to explore distortion, filtering and compression together without setting up a multiband split. Its 22 presets provide quick starting points for kicks, bass and drums. Phantom has 110 presets spanning bass, drums, leads, percussion and other sources. Those numbers describe choice, not a quality score.
| What you hear | First audition | Reject it if… |
|---|---|---|
| Kick sub works; midrange lacks edge | Phantom: locate the body/presence band, add restrained Drive, then unsolo. | The hit shrinks or the bass line becomes harder to follow at matched loudness. |
| Whole bass sound needs a different texture | Crusher: audition Tube and Mech separately before adding filter or compression. | Higher notes rasp while the lowest note only becomes louder. |
| Hat bus is already bright and brittle | First reduce the offending source; compare less upper-band processing with a filter change. | You need extra output gain to disguise a duller groove. |
| Lead is narrow but its tone already works | Check whether it is mono before choosing a width process; distortion may not be needed. | The hook loses notes or apparent position when folded to mono. |
Build a comparison that can actually reject a plugin
Use three versions of one recorded phrase: clean, Phantom only and Crusher only. Audition one at a time through the same monitoring chain; do not sum the three channels or put the two effects in series for this test. A prerecorded phrase avoids comparing different performances or random synth variations. This is a listening protocol for your session, not a claim that we have supplied matched audio renders.
- Keep the input fixed. Start from the same file, clip gain and pre-effect routing. A higher input changes what a nonlinear processor does. Do not compensate a loud output by reducing the input and then call it the same setting.
- Record the moving parts. Note plugin version, preset, global and band Mix, Auto Gain, HQ and output protection. For a comparison, keep each plugin’s compensation state unchanged between passes and use a separate post-effect gain control for the final level match.
- Match what you hear over the phrase. Use the same loop and monitoring level, then trim the louder version. A peak meter alone cannot make the versions equally loud; a loudness reading is useful context, not a verdict on tone or transient quality. Bob Katz explains this peak-versus-loudness distinction in Level Practices, section II.
- Return to the arrangement. Compare the first hit, the busiest fill and a note change, in stereo and mono. Write down a result such as “tail hides the next bass note” instead of “bigger”. Keep the clean version if neither treatment improves the named problem.
Matching knob positions is not a controlled sonic comparison. As a documented example, Saturn 2’s band controls include per-band wet/dry mixing and compensation associated with Drive. That is a reason to inspect each processor’s signal controls, not evidence that Phantom shares Saturn’s algorithms. In this guide, choose settings independently for the same musical aim, then compare the results.
A hard-techno kick: add edge without losing the hit
- Loop a phrase, not one hit. Include the bass, a fill and any note change. Save an unprocessed comparison and leave headroom after the effect. Turn monitoring down before exploring aggressive settings.
- Name the problem. Is the attack hidden, the tail too long, the body hollow or the midrange too smooth? A longer distorted tail is not automatically a heavier kick. Fix the source envelope or arrangement when that is the actual issue.
- In Phantom, start from Init and open Expert. Solo the bands to locate the body and the audible edge, adjusting the crossover frequencies to this kick. Leave the low band conservatively processed. Add Drive to the body or presence band first, then return every monitor to Normal.
- Compare character at the same Drive. Increase Drive above zero before evaluating Soft, Warm and Hard. Then compare the band mix and Punch separately. If the attack flattens or the tail masks the next kick, back off and shorten the source tail if needed.
- Alternatively, try Crusher on its own. Compare Tube and Mech, then bring in filtering or compression only if it solves the named problem. Start fully wet while learning the distortion, and check any partial dry/wet blend in mono. Do not assume stacking both plugins is an upgrade.
- Match output level and bypass. If the processed version only wins when louder, reduce its output and listen again. Reject a setting that loses the kick beneath the bass or makes the next bar less clear.
To try this with your own material, follow the Crusher installation guide for Ableton Live and FL Studio. Use the same loop for the clean and processed comparison; the output-level check above matters more than matching somebody else’s preset.
Leads, hats and percussion need a different decision
A bright lead may need body rather than another high-frequency boost. A hat with harsh peaks may need less upper-band Drive, a lower band mix or a filter change. In Phantom, isolate the range causing the problem before touching the low band. In Crusher, compare a restrained distortion setting with the filter more closed, then match the output level.
Use width deliberately. Phantom’s normal M/S width needs existing stereo information; turning it up on a mono signal is not a reliable widening test. Haas and Spread can introduce delayed-side content above 100%. Keep the low foundation centred when appropriate, and check the whole phrase in mono before accepting a wider lead or percussion bus.
Why a mono input cannot grow Side information by multiplication
Here is a small linear model, not a reconstruction of Phantom or Crusher. Define Mid as (L + R) / 2 and Side as (L − R) / 2. Rebuild the channels as L′ = Mid + w × Side and R′ = Mid − w × Side. The variable w is only a Side multiplier: it is not a mapping to a plugin’s percentage knob.
| Case | Input L / R | w | Output L′ / R′ | Mono |
|---|---|---|---|---|
| Mono input, more Side gain | 0.40 / 0.40 | 2 | 0.40 / 0.40 | 0.40 |
| Stereo input, Side removed | 0.60 / 0.20 | 0 | 0.40 / 0.40 | 0.40 |
| Stereo input, unchanged | 0.60 / 0.20 | 1 | 0.60 / 0.20 | 0.40 |
| Stereo input, Side doubled | 0.60 / 0.20 | 2 | 0.80 / 0.00 | 0.40 |
| Opposite-polarity pair | 0.40 / -0.40 | 1 | 0.40 / -0.40 | 0.00 |
The first row stays mono because its Side is zero. The stereo example changes channel amplitudes while preserving the average in this specific linear model. The last row cancels in mono. None of this proves that a complete plugin chain preserves its mono output: delayed-side generation, filtering and nonlinear stages are outside the model.
For a practical output check in Live, Utility’s Mono switch folds the stereo input to mono. Place it after the tested effect and compare the full phrase. Do not confuse Utility’s separate Width and Mid/Side modes: its manual documents a Side-only endpoint in Mid/Side mode. The table above does not simulate either control.
When a preset seems to do nothing
- Check routing first: the effect must be enabled on the channel you hear. Check host bypass, plugin Power, global Mix, band bypass and band mix.
- Check the source: a preset aimed at hats may do little to a near-sine sub. A stereo control may do little to a mono kick. A character change needs enough Drive to become audible.
- Check monitoring: return Solo or Mute to Normal before judging the full result. Presets are starting points; their name does not know your source level, key or arrangement.
- Check compensation: Auto Gain can reduce a loudness jump, but it is energy matching, not a LUFS measurement. For a controlled comparison, use the same compensation setting throughout and adjust final output by ear.
Phantom’s Diffuse adds low-frequency density within a band; it is not a reverb. Its Limiter is a sample-peak safety clipper, not a true-peak mastering limiter. HQ selects 8x rather than 4x oversampling; both paths remain active, so HQ off is not a CPU-saving mode. These are practical boundaries, not reasons to turn every control on.
Those Phantom behaviours are documented release properties, not new CPU, true-peak or audio measurements made for this article. Do not transfer assumptions between products: Saturn 2’s output documentation describes its own HQ trade-off and limits its Linear Phase setting to crossovers and oversampling filters, not every tonal process. A multiband label by itself does not guarantee an unchanged sub, zero phase shift or phase-safe parallel blending. Check the complete chain, including any dry/wet blend.
Download the free Mac VST3 releases
Both downloads support macOS 11 or newer, Apple Silicon and Intel, and a VST3-compatible DAW. They are free, with no signup required. The installers are Developer ID signed and Apple notarized. There is no Windows, AU or AAX download; Logic Pro does not load these VST3s directly.
- Get JDMeet Phantom — four-band saturation and 110 presets.
- Get JDMeet Crusher — distortion, filter, compression and 22 presets.
- Phantom installation steps · Crusher installation guide.
This guide covers Phantom 0.7.1 and Crusher 0.1.5. Always check the product page for the current release and compatibility notes. Neither is presented as an exact sonic replica of another commercial plugin or hardware unit.
Revisiting a Crusher 0.1.4 project? The 0.1.5 release notes report a revised Mech clipping knee; identical old values do not promise identical sound. Keep a recoverable project copy and compare a reference render. Our Crusher release-validation article separates package checks from audio and host tests.
Continue with the problem you actually hear
Control a distorted hardcore kick tail · Understand saturation, distortion and clipping · Diagnose kick and bass cancellation.
For a narrower task, the four-plugin catalogue also includes Filter and Stutter. They are not substitutes for a diagnosis. If you need an outside review of the balance after your own comparisons, see the Mixing & Mastering project enquiry.
Sources, product facts and the limits of this guide
Reviewed 10 September 2026. The choice matrix, session protocol and numerical examples are our own teaching material. No expert endorsement, independent product ranking or new listening-test result is implied. Screenshots show our actual Phantom interface; we have not substituted a drawn Crusher interface for a real capture.
- Bob Katz — Level Practices, Part 1: section II on loudness versus peak readings and consistent monitoring. Its historical hardware examples are not installation or metering specifications for these plugins.
- Ableton Live 12 manual — Utility: Mono, Width and the separate Mid/Side mode.
- FabFilter Saturn 2 — band controls: an official reference illustrating that drive and band mixing must be interpreted per product.
- FabFilter Saturn 2 — output controls: implementation-specific HQ and Linear Phase scope, not Phantom specifications.
- JDMeet Phantom release documentation and JDMeet Crusher release documentation: our developer-supplied controls, release versions and compatibility information.