First, separate the kick into time regions
The front edge tells the ear where the hit starts. The early body carries impact. The pitch fall creates the transition into the tail, and the tail supplies sustained weight and identity. Processing the entire sample as one block can solve one region while damaging another.
Ableton’s DS Kick exposes this architecture directly: pitch, pitch-envelope amount, attack, click and decay are separate controls. Operator likewise provides independent oscillator, filter and pitch envelopes. The lesson applies even when the source is audio: timing and pitch movement should be diagnosed before adding another EQ or limiter.
1. Set pitch movement before distortion
Loop the kick without bass and listen to the transition from punch into tail. If the pitch falls too slowly, the tail may sound like a tom before reaching its body note. If it falls too quickly, the kick can feel disconnected or clicky. Adjust the pitch envelope by ear against the track’s tempo and tonal center; there is no universal millisecond value.
Then add the bass or rumble. Decide whether the kick tail itself owns the sustained low note or whether a separate bass does. Two sustained low sources can compete for headroom or reinforce and cancel unpredictably. This is a risk, not a ban on overlapping fundamentals: choose their levels, envelopes and roles in the full phrase.
2. Shape the amplitude envelope around the groove
Decay controls more than length: it determines how much energy survives when the next kick arrives. At fast hardcore tempos, a tail that sounds impressive in isolation can stack into a continuous low-frequency floor. Shorten it until consecutive hits remain distinct, then restore only the sustain the arrangement needs.
Listen to several bars, not one hit. If alternate notes or fills change the perceived weight, automation or separate samples may be clearer than forcing one envelope to cover every section.
Why a shorter MIDI note may not shorten the kick
Before adjusting another effect, check how the sampler responds to note-off. The length of a MIDI note is not always the length of the sound it triggers.
- FL Studio Channel Sampler: activate the volume envelope if you want note release to affect playback. For pitch experiments, distinguish ordinary rate-changing playback from stretching: Resample changes pitch and duration together, while Stretch can preserve duration across notes. The Time stretching PITCH knob preserves length and switches Resample to Auto when adjusted. Confirm the actual mode after the change; these controls are not interchangeable. See Image-Line’s Sampler settings.
- Ableton Live Simpler: One-Shot with Trigger plays through after note-off; shortening the MIDI note will not end the tail. Gate starts its fade-out on note release, while Classic offers an ADSR envelope. Check Warp separately from the envelope: tempo-following playback and amplitude shaping solve different problems. See Ableton’s Simpler playback modes.
For an audio clip, try an end fade rather than assuming a hard trim is transparent. An abrupt waveform discontinuity can create a new click. Listen to the edit in the full hit as well as near its end; an unnecessarily long fade can remove the tail character you wanted to keep.
Test the actual note-off response. In a saved copy, bypass downstream effects, preserve velocity and pitch, and compare one long MIDI note with one short note. Keep the same sample region and loop settings. If their ends are identical, confirm the playback mode before modifying release. Restore the effects and compare repeated hits too: a voice cut or retrigger can create a different ending from an isolated note.
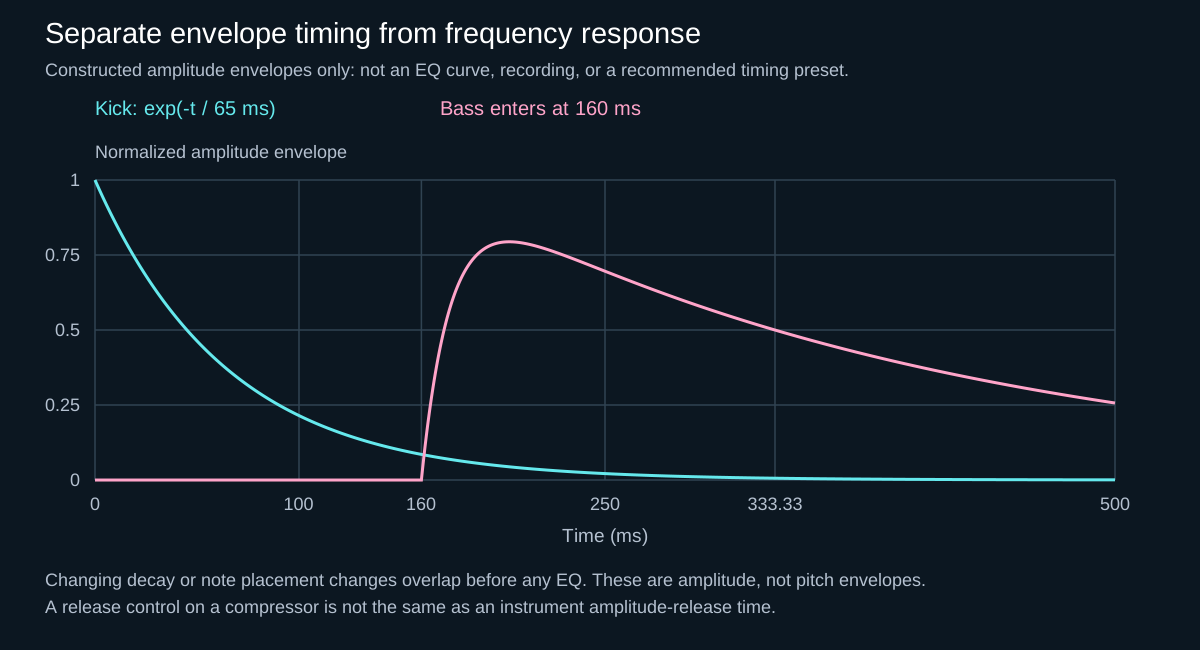
Pitch envelope is not amplitude envelope
A falling pitch changes cycle length; amplitude decay changes how strongly those cycles persist. One can move without the other. On audio, shortening a tail with a fade does not undo its pitch sweep. In a synth, change one envelope at a time, then compare multiple hits with bass present. A single FFT snapshot cannot show the entire pitch trajectory.
The envelope diagram is constructed, not a recording. Its kick-decay constant and delayed bass entry are illustration parameters. A fade changes amplitude but does not directly retune the surviving waveform cycles. A pitch envelope changes their rate; conventional sample transposition can move both pitch and timing together.
A calculated example: retuning can move the sample end
For ideal rate-changing playback, the multiplier is r = 2^(semitones / 12). A frequency becomes f × r and a sample duration becomes T / r. The following hypothetical sample lasts 300 ms and has a stable 60 Hz tail region. The octave jumps make the relationship obvious; they are not musical recommendations.
| Transpose (semitones) | Playback rate × | Tail frequency (Hz) | Sample duration (ms) |
|---|---|---|---|
| -12 | 0.500 | 30.00 | 600.00 |
| 0 | 1.000 | 60.00 | 300.00 |
| +3 | 1.189 | 71.35 | 252.27 |
| +12 | 2.000 | 120.00 | 150.00 |
At +3 semitones the end moves to about 252 ms, even though the MIDI onset did not move. Turning the result down cannot restore the missing time. A pitch-preserving time stretch or duration-preserving pitch shift uses a different process and is outside this table. Neither process guarantees transparent transients; compare the front edge, tail texture and next bass entry at a similar output level.
Choose the control from the goal. To shorten the tail without deliberately retuning it, begin with an amplitude envelope or end fade. To preserve length while changing key, test an appropriate stretching mode. To change the entire hit’s speed and pitch together, rate-changing playback may be exactly right. This page handles one kick’s evolution; use the kick/bass diagnostic guide when the fault appears only after another low-end source enters.
3. Distort in stages you can audit
Pre-filtering decides which part of the kick drives the nonlinear stage. Distortion then generates harmonics; post-filtering removes the products that do not belong. For example, FabFilter Saturn 2 separates Drive from Tone and band Level. These controls do not perform the same job; the conceptual chain below is a teaching workflow, not a claim about the complete internal routing of Saturn or Crusher.
Start with one distortion stage and level-match its output. Add another only when it performs a different job—for example, one stage for body density and another for tail character. More stages are not automatically louder or better; they can also accumulate unwanted noise, resonances and aliasing.
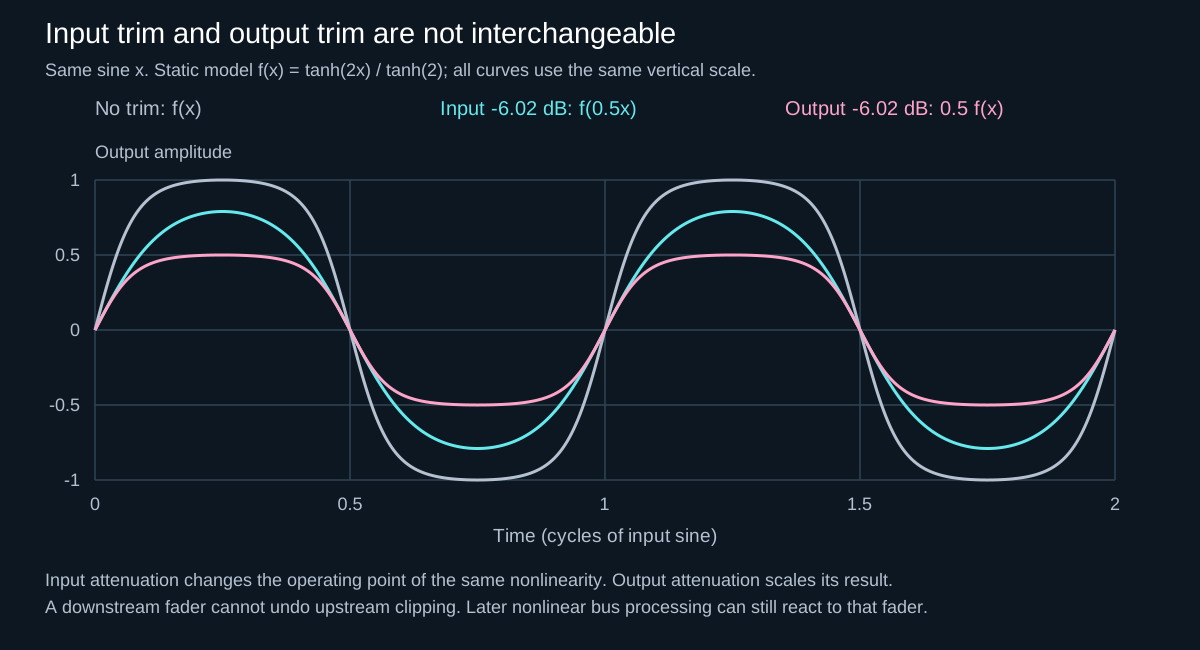
In this calculated waveshaper example, reducing the input changes what reaches the nonlinear curve; reducing output scales a result that has already been shaped. The plotted alternatives deliberately have different levels, so the picture cannot establish a preferred sound. For a listening comparison, trim after the tested stage and keep later bus processors from changing the comparison accidentally. See the distortion and signal-order examples.
In Saturn, Drive also adjusts output automatically, while Tone shapes the processed band. That compensation is not evidence of equal perceived loudness. If an apparent extra tail remains at matched level, check whether compression, feedback or a downstream return is contributing; do not attribute every change to the distortion curve alone.
4. Control resonances without hollowing every hit
Find a suspected ring while the whole pattern loops. Bypass the band repeatedly. A narrow static cut is useful when the resonance exists on every hit. If it blooms only on the loudest tail moments, dynamic EQ can reduce it temporarily. If the tone moves with the pitch envelope, a fixed notch may chase the wrong problem; revisit synthesis or automate the control.
Never copy a frequency from another kick. The note, pitch path, distortion curve and sample rate determine where energy appears. Use an analyzer to confirm what you hear, not to choose the correction automatically.
If you cannot tell whether the problem is a persistent ring or a short event, use the static versus dynamic EQ comparison. For uncertainty about the display itself, start with reading a spectrum analyzer. Neither graph replaces listening to the evolving tail.
Before another processor: five fault checks
| Symptom | First controlled check | Avoid concluding |
|---|---|---|
| Shorter MIDI notes leave the tail unchanged | Check whether the playback mode responds to note-off; compare long and short notes with effects bypassed. | Do not add compression before confirming the note actually controls duration. |
| A tuning change also changes the groove | Compare the sample end and pitch in rate-changing versus duration-preserving playback. | The change is not necessarily a timing error in your MIDI pattern. |
| A click appears only at the next hit | Compare an isolated hit with a repeated pair; inspect fades, overlapping voices and choke/retrigger behaviour. | A later discontinuity does not prove the original sample attack is faulty. |
| The tail becomes a fixed ring only after drive | Bypass that stage at matched level; compare input balance, drive and post-filtering separately. | Do not move several filters at once or assume every resonance needs a permanent notch. |
| The kick works alone but weakens with the bass | Restore the reference kick and diagnose the pair, including balance and polarity over several notes. | More kick distortion does not establish which interaction caused the loss. |
5. Preserve the transient deliberately
A compressor with a very fast attack can reduce the first waveform cycles and make the tail appear louder by comparison. FabFilter warns that fast timing on low-frequency material can react to individual cycles, causing distortion and disproportionately attenuating low end. If the transient needs protection, compare slower attack, transient shaping, parallel processing or simply separating the click layer.
Any numerical attack or release setting is only a starting point. Listen for whether the front edge remains intentional and whether gain reduction recovers in a way that supports the next hit without fluttering. Complete recovery before every hit is not compulsory.
6. Test translation, not just loudness
Check the kick quietly, in mono and on a smaller speaker. The intended low-frequency pitch trajectory should remain readable on a full-range system; a deliberately falling pitch need not be constant. The generated harmonics should describe the kick when deep bass is unavailable. If the kick vanishes on a small speaker, selectively adding harmonics can be more useful than raising sub level.
Finally compare the processed and bypassed versions at matched loudness in the complete drop. Keep the version that preserves impact, exposes the intended tail character and leaves a clear role for the bass.
Small-speaker audibility is not a sub-level calibration. Compare full-range playback at more than one sensible listening position, because room response can exaggerate or hide a ring. A mono fold-down tests left/right interaction; it is not interchangeable with flipping polarity between a kick and a bass track.
A three-pass kick-tail experiment
Save a temporary copy of the session and keep an untouched reference. Include a repeated kick, a fill and the following bass phrase. Change only one variable per pass; these are listening instructions, not claims of a measured improvement.
- Pitch pass: leave effects and fades alone. Try a nearby tuning in the sampler and note whether playback duration also changes. Compare the entire hit with the bass restored. A more compatible tail is not an improvement if the front now feels wrong.
- Length pass: return to the reference tuning. Change only the tail envelope or end fade. Listen for the next hit becoming clearer without turning the current hit into a click. Keep the sustain that serves the phrase, not a rule that every tail must end before the next kick.
- Drive pass: restore the reference length, then change one distortion stage and match its output level. Decide whether the missing quality is harmonic texture or simply louder sustain. Changing level before distortion changes its operating point; turning it down afterwards does not undo that change. The gain-staging guide explains this distinction.
Only combine the changes that solved their individual problem, then audition the combination again. If the weak spot moves from the tail to the click or the next bass note, revisit the affected stage instead of treating a longer processing chain as progress.
Try the workflow with JDMeet Crusher
For a free Mac VST3 with Tube and Mech distortion, filtering and compression, download JDMeet Crusher for Apple Silicon and Intel. Use its Mix and output controls to compare the processed sound at a similar loudness. The installation guide covers Ableton Live and FL Studio.
Sources / Further Reading
The sources describe different control layers rather than a universal kick preset. Image-Line distinguishes rate-changing playback from length-preserving modes; Ableton separates Trigger/Gate note handling from Warp; Saturn separates nonlinear drive, processed tone and output level. Maarten de Boer’s compression discussion adds a warning about fast gain movement on bass. Our practical conclusion is to identify the responsible layer before compensating with another one. The calculations and diagnostic sequence here are original teaching material, not source screenshots, a transcript adaptation or measured plugin performance.
- Ableton Live Manual — DS Kick
- Ableton Live Manual — Simpler playback, envelopes and warping
- Image-Line — Sampler note-off, stretching and declicking
- FabFilter Saturn 2 Help — Band Controls
- FabFilter — compression timing on bass material
The original diagrams show declared models and workflow relationships, not authentic DAW interfaces. Reproduce the listening experiment in your own material; do not infer measured kick performance from a drawn envelope or a transfer curve.