In fast hard techno, the kick is not only a drum hit. Its body and distorted tail can already behave like a bass instrument. Adding a separate bass without considering that existing sustain can make the combined rhythm less distinct, even when each sound works alone.
Masking, cancellation or ducking?
“The bass disappears when the kick arrives” describes a symptom, not its cause. Use these checks before adding EQ. More than one mechanism can be present.
- Masking: one sound becomes harder to distinguish.
- The combined signal need not become quieter. Briefly lower the competing part without changing processing. If the missing rhythm becomes easier to follow, rebalance the arrangement or tone before chasing a phase fix. This is a listening clue, not a conclusive measurement.
- Cancellation: the signals subtract in their overlap.
- In a saved diagnostic copy, compare polarity on one source with processing unchanged. A substantial change in the summed low end points to a phase relationship worth investigating; it does not mean one position is correct for every bass note. The phase and polarity guide explains why a sign flip and a time shift are different operations.
- Ducking: a processor deliberately reduces gain.
- Watch the gain-reduction display and audition the detector. If the bass still dips too far with only the kick-driven dynamics stage active, inspect its range, routing and recovery before changing sample timing. A gain-reduction meter describes that processor, not the amount of acoustic masking.
1. Decide who owns the sub
Start with a role decision, not an EQ curve. If the kick has a long, pitched tail, let it carry the deepest weight and move the bass above or between its impacts. If the kick is short and click-focused, the bass can hold more of the sustained sub. These are starting roles, not a requirement to remove every shared low frequency. Keep overlap when it supports the phrase and leaves enough headroom.
2. Fix the arrangement before the plugins
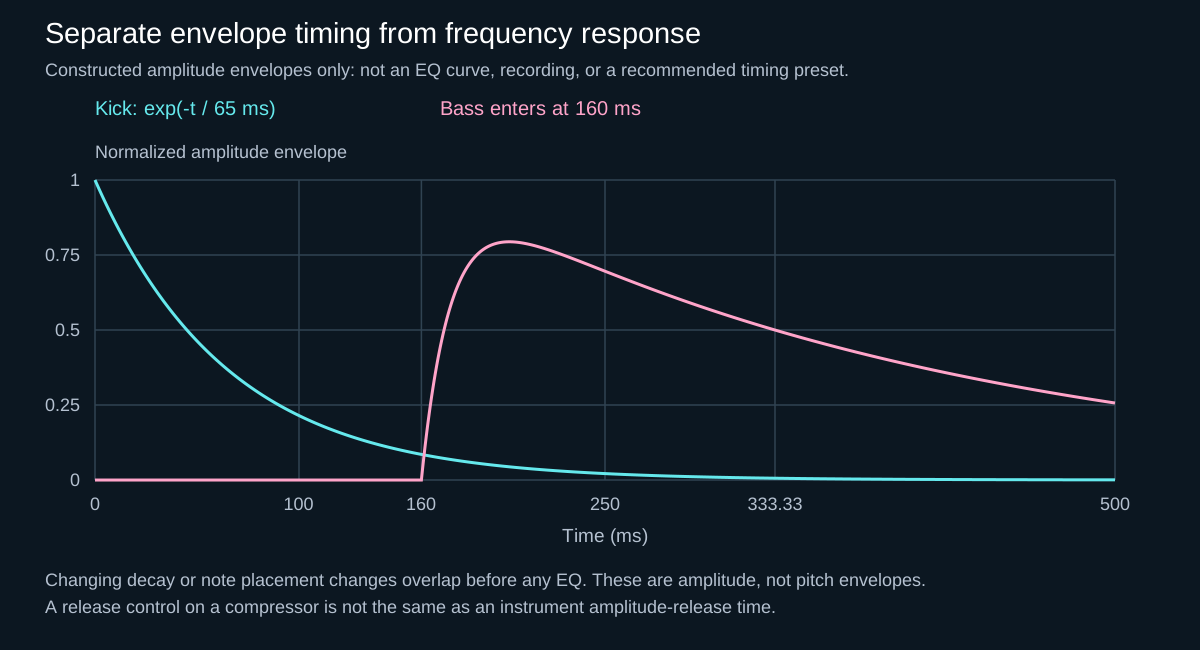
Solo the kick and bass, then inspect where their notes and envelopes overlap. Try the kick decay or bass-note length before reaching for aggressive EQ. If you move an onset, treat the amount as a listening experiment: timing also changes the groove and the phase relationship. Keep the main kick on its intended grid while judging any bass move.
A sampled kick may ignore MIDI note-off, depending on its playback mode. Use the FL Studio and Ableton kick-tail checks before assuming that a shorter note has shortened the audio.
In the original diagram, the kick has a constructed 65 ms exponential decay constant and the bass begins at 160 ms. These are illustration parameters, not suggested settings. The lines show amplitude envelopes, not the positive and negative cycles of the audio. Their overlap cannot predict cancellation: phase and pitch information is deliberately absent. Judge a shorter tail through the next bass note and the fill, not only at the first impact.
3. Tune by listening, not by forcing a rule
Identify the kick's stable low resonance with a spectrum analyzer, but confirm the decision with your ears. A useful tuning relationship does not require every transient to display a perfect musical note. Compare nearby tunings in the full groove and choose the version that produces the cleanest combined envelope.
The strongest spectral peak may be a harmonic, not the fundamental. A falling-pitch kick also has no single fixed note throughout its attack and tail. Compare a later, more stable section before deciding to retune.
| Observation | What it supports | What it does not establish |
|---|---|---|
| Separate spectra overlap | Both sources contain energy in a shared region. | Which rhythm is perceptually hidden, or whether the signals cancel. |
| A summed spectrum has a dip | The measured sum has less energy there under these display settings. | A cause: source content, timing, filtering and dynamics still need separate checks. |
| Gain reduction follows the kick | That processor is asking its gain stage to attenuate. | How much masking existed, or whether this is the only active gain-control stage. |
| Polarity changes the combined body | Relative phase affects this particular overlap. | That the louder position stays useful across other pitches and oscillator starts. |
Make the display comparison fair. Compare the same passage and signal tap with unchanged gain, FFT resolution, averaging and tilt. A long analysis window can separate nearby frequencies more clearly while blurring when the kick changes. A peak-hold trace can include moments that never happened together. Neither a shared peak nor a coloured collision warning demonstrates an audible problem by itself. FabFilter explicitly treats collisions as an indication; its display tilt changes the view, not the sound. See the spectrum-analysis checks before using a trace to choose an EQ cut.
4. Check polarity and timing
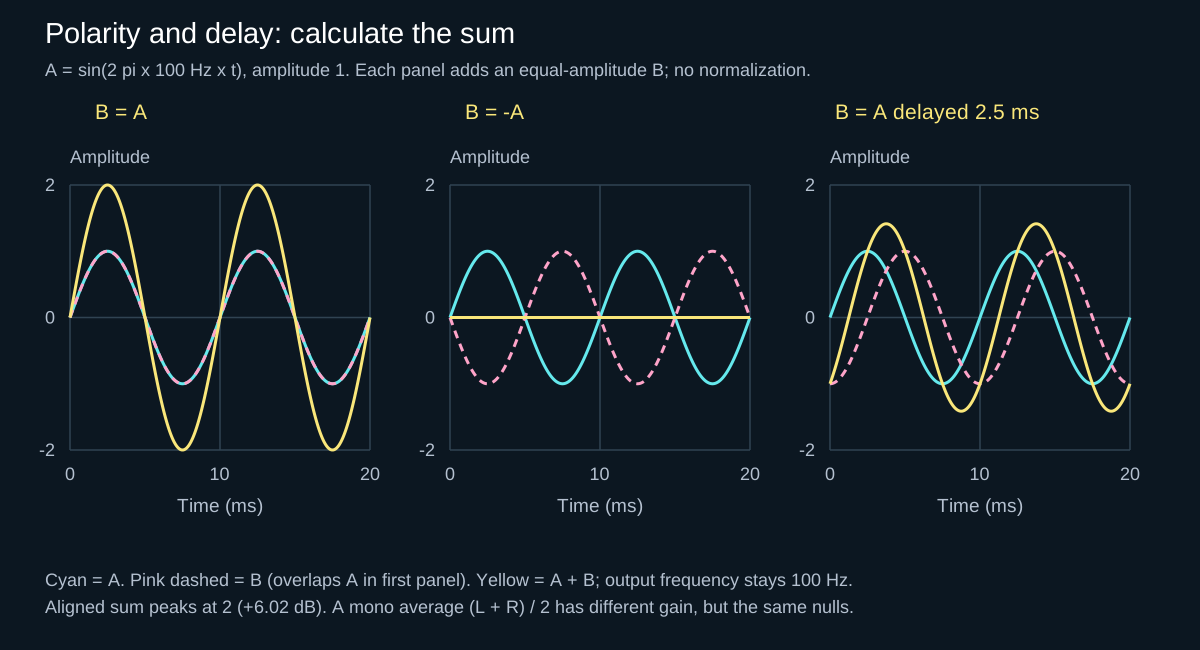
A fixed nudge cannot lock a free-running oscillator or two different pitches across every note. If alignment changes from hit to hit, revisit oscillator restart, sample choice, envelope overlap or arrangement instead of repeatedly chasing one perfect waveform.
Low frequencies can partially cancel when the kick and bass move in opposing directions. Flip polarity as a quick test, then make small timing adjustments while listening in mono. Keep the option that keeps the intended weight and note definition across several bass notes, not merely the largest peak on one hit.
The sine-wave diagram isolates the arithmetic: two equal 100 Hz waves sum to twice the amplitude when aligned, cancel when exact opposites, and partially reinforce after the illustrated delay. Real kick and bass parts are not identical copies. Do not use the diagram to infer that matching their start points, or inverting either one, will produce that same result. For a stereo bass, first distinguish a change between kick and bass from a change between its own left and right channels.
5. Use complementary EQ sparingly
If the level test points to tonal competition, try a modest cut in the supporting element and adjust its width by ear. Avoid carving a dramatic static hole before checking the arrangement and envelope. The objective is separation without making either source thin when the other one stops.
Make the cut earn its place. Listen first where both parts play, then where the kick drops out. If the bass becomes intelligible in the collision but loses its body in the gap, compare a time-dependent cut rather than deepening the static one. If the same bass note is excessive even without the kick, an externally triggered band may miss the actual problem. If polarity changes reverse the apparent problem, revisit that interaction before treating it as a fixed tonal excess. The EQ fundamentals guide explains bandwidth and filter choices.
6. Sidechain for shape, not a preset number
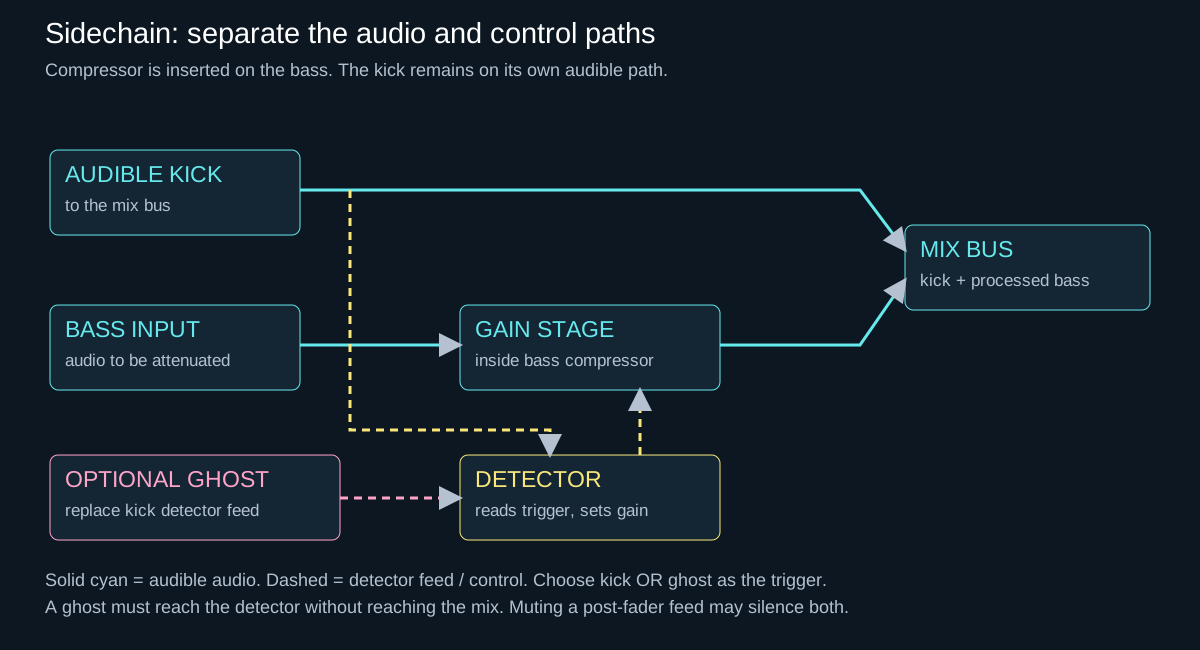
Feed the kick into a compressor on the bass. Set the attack fast enough to reveal the kick's front edge, then time the release so the bass returns with the groove rather than swelling late. Listen at low volume: if every kick remains readable without an exaggerated pumping effect, the gain reduction is probably doing useful work.
Prove the trigger path in a copy: remove one kick event while leaving a sustained bass note. With kick-only external detection, attenuation should recover through that gap according to the processor’s timing. If a fresh duck still happens at the missing beat, check a ghost trigger, detector blend or volume automation. Restore the event afterwards. Filtering the detector changes what triggers the compressor; it does not make wideband gain reduction affect only the filtered frequencies.
The displayed reduction range is only an optional starting experiment, not a target to reach. Less or no ducking may be right. If recovery sounds late, audition the detector first: a long kick tail can keep triggering reduction, so a shorter release alone may not fix the shape. Follow the sidechain routing and listening workflow.
7. Use dynamic EQ when full-band ducking is too obvious
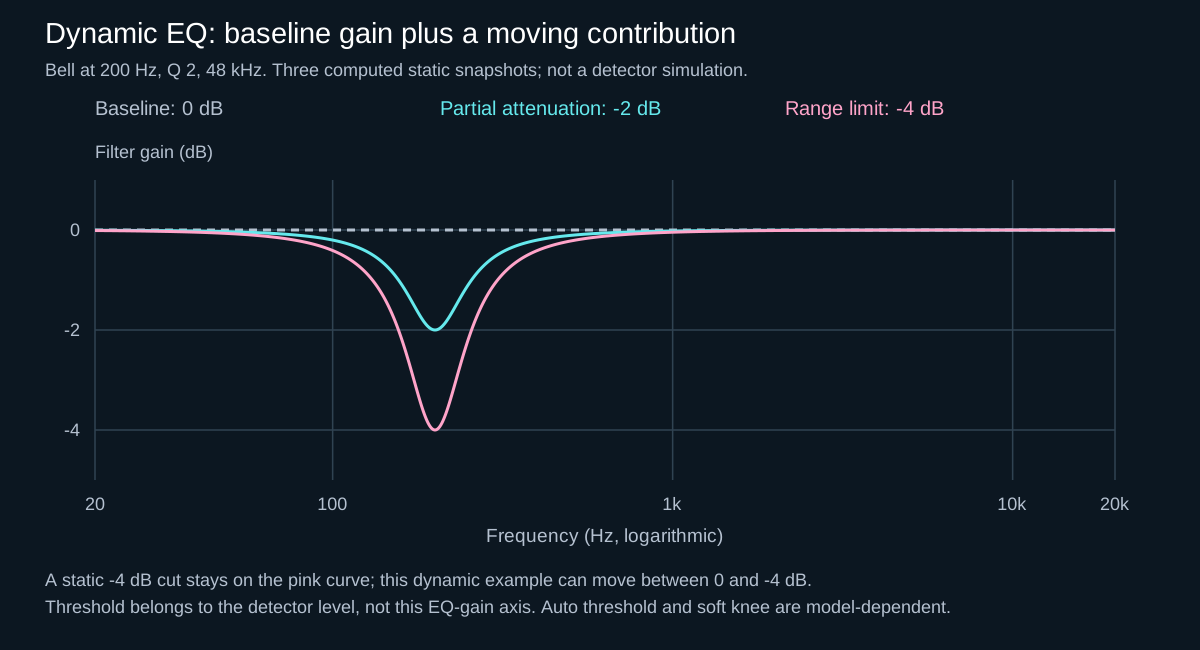
If sidechain compression makes the entire bass disappear, trigger a dynamic EQ band around the region where the kick needs space. This can leave more of the bass spectrum intact than wideband ducking, but a bell has finite width and slopes: neighbouring harmonics can still change. Compare tone between hits as well as kick clarity; use the dynamic EQ guide to check baseline gain, range and detector routing.
The original bell plot in this section uses 200 Hz, Q 2 and gain snapshots from 0 to −4 dB purely to show a changing response. It does not model a detector or establish where your kick needs space. Select an external kick feed if the kick should trigger the band, then check that a missing kick stops new triggers. With self-detection, a strong bass note can instead move the band while the kick is silent; that can be useful, but it is a different decision.
8. Control everything outside the low-end pair
Synths, reverbs, distorted percussion and effects can quietly fill the same region. Remove unnecessary low information from supporting sounds, but do not high-pass every track by habit. Filter only when the change improves the full mix rather than making it smaller.
Bring supporting tracks back one group at a time at their original levels. If clarity fails only after a reverb return enters, compare that return’s level, decay and filtering separately. If it fails only after the normal bus chain returns, inspect bus gain reduction and nonlinear processing before cutting more from the bass. Keep the monitoring level safe when bypassing loudness-changing stages.
9. Test the system, not the solo
| Check | Listen for | Limit |
|---|---|---|
| Full-range playback | Can you follow bass notes as well as the kick? | One room and listening position can exaggerate or hide a low-frequency region. |
| Mono fold-down | Does the bass role change markedly when L and R are summed? | Mono compatibility is not the same test as polarity between kick and bass tracks. |
| Small speaker | Does the phrase remain readable through the harmonics it reproduces? | It cannot validate sub-bass extension or tell you how much deep bass a club needs. |
| Quiet playback and exported phrase | Is the rhythm still understandable, including the fill and transition? | Neither check certifies club translation or replaces listening at a sensible reference level. |
Compare against a level-matched reference, check mono, reduce the monitoring level and test on a small speaker. Listen for whether the intended rhythm survives in the harmonics that system can reproduce. Finally, export a loop and audition it away from the session before committing to more processing.
A three-pass phrase experiment
Save a diagnostic copy and choose a loop with repeated kicks, at least one different bass note and the transition into the next phrase. Keep a reference version. Temporarily bypass bus dynamics or saturation when isolating a problem, and lower monitoring level before bypassing anything that can change loudness. Re-enable the actual mix chain for the final decision.
- Balance pass: leave tuning and timing unchanged. Reduce one source, then restore it. Note which rhythm becomes readable and whether the other source loses its musical role. Do not normalize these test versions: the level change is the variable you are testing.
- Overlap pass: restore reference levels, then change only one envelope. Compare the busy passage and the space after the fill. If you later test polarity or a timing offset, restore the envelope first so you can distinguish the effects. Random oscillator starts or modulation can prevent identical repeats; an audio render can hold one realization steady for diagnosis, but the live instrument still needs a final check.
- Processing pass: restore the reference again. Compare one gentle EQ move, one wideband duck and one externally triggered dynamic band as separate alternatives, not a stacked chain. Match output for the processing comparison. Listen for the kick attack, bass recovery and tone between hits; a lower meter peak alone does not decide the winner.
Return the other instruments and the normal bus processing. Keep only an option that solves the named problem through the complete phrase. If the low end becomes weaker only when a bus processor returns, inspect that stage and its input level; the gain-staging guide shows why output trim cannot undo upstream nonlinear processing. This is a repeatable listening exercise, not a claimed measurement of a JDMEET mix.
Why the sources offer different tools
iZotope’s masking overview discusses both tonal separation and time-varying reduction. Ableton’s Compressor documentation describes an external detector controlling the processed track’s gain. FabFilter’s dynamic EQ documentation separates band gain, dynamic range and detector choice. These are different scopes of intervention, not competing universal prescriptions. A detector filter on a wideband compressor does not turn its output into a frequency-selective duck.
Our conclusion for hard techno: select the smallest intervention that preserves the intended kick-and-bass conversation. Continuous tonal imbalance, a brief collision and an unstable phase relationship should not automatically receive the same treatment.
Sources / Further Reading
This article is an original JDMEET workflow informed by documentation and educational material from the following primary audio-software publishers:
- Ableton Live 12 Manual — Compressor and dance-music sidechaining ↗
- iZotope — How to Mix Kick and Bass ↗
- iZotope — Frequency Masking and Dynamic EQ ↗
- FabFilter Pro-Q 4 — Spectrum analyzer ↗
- FabFilter Pro-Q 4 — Dynamic EQ and external sidechain ↗
The four plotted or routed figures are original teaching illustrations with their assumptions stated, not screenshots of these products or measurements of a JDMEET track. The comparison tables are diagnostic prompts, not automatic diagnoses. Source documentation explains specific tools; the listening protocol and hard-techno applications here are our own synthesis.