Three controls, one decision
A parametric bell filter has three core controls. Frequency chooses the centre of the move. Gain decides how much that region is boosted or cut. Q changes the bandwidth: higher Q is narrower; lower Q is broader. FabFilter notes that Q values are not interpreted identically by every EQ, so copying a number between plug-ins does not guarantee the same curve.
What is Q factor in EQ?
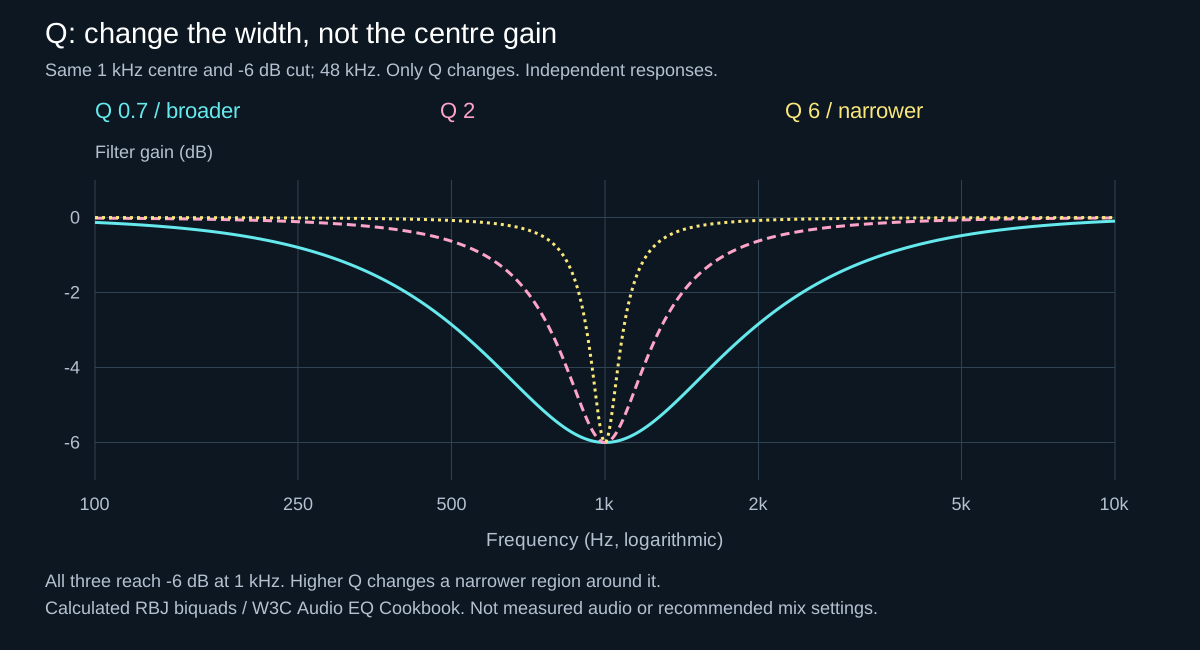
Q, short for quality factor, describes a filter’s selectivity. For a conventional parametric bell, higher Q narrows the boost or cut around its centre; lower Q spreads it across a wider frequency range. It is not a percentage or a measure of sound quality. Frequency decides where the bell sits, gain decides its centre boost or cut, and Q decides how much neighbouring material is affected.
The next comparison holds the centre at 1 kHz and the cut at −6 dB. Only Q changes. Every curve reaches the same depth at the centre, yet the broader cut attenuates more of the surrounding frequencies. These are deliberately contrasting teaching values, not a suggested correction for a kick or vocal.
Hear bandwidth before chasing a Q number
- Choose a repeatable problem. Loop a metallic percussion hit alongside the kick and bass. Identify a persistent ring at a comfortable monitor level. Select one static bell, find its centre and choose a modest cut that makes the ring easier to judge. Do not copy the illustration’s 1 kHz or −6 dB into the mix automatically.
- Hold everything except Q steady. Keep frequency, band gain, filter shape and processing mode unchanged. Disable dynamic processing, auto gain and gain/Q coupling for this isolated comparison. In Pro-Q, check Gain-Q interaction; in EQ Eight, check Adaptive Q. Save a broader and a narrower version in the same EQ.
- Listen for the cost of the correction. Match apparent loudness with a separate clean output trim. Does the ring recede without losing the hit’s body? Does a very narrow cut leave nearby ringing untouched? Compare in the groove, then on a different hit or fill. Keep the version that fixes the named problem while preserving the percussion’s role—not whichever curve looks most surgical.
On a high-pass or low-pass, Q can change resonance near the cutoff; it is not interchangeable with the slope in dB/octave. The bell-width example does not predict every filter shape. The manuals also differ in Q conventions: Pro-Q documents its bandwidth and Gain-Q behaviour, while EQ Eight documents Adaptive Q. Compare the resulting response and sound, not identical knob numbers across brands.
Read the filter curve, not an imaginary spectrum
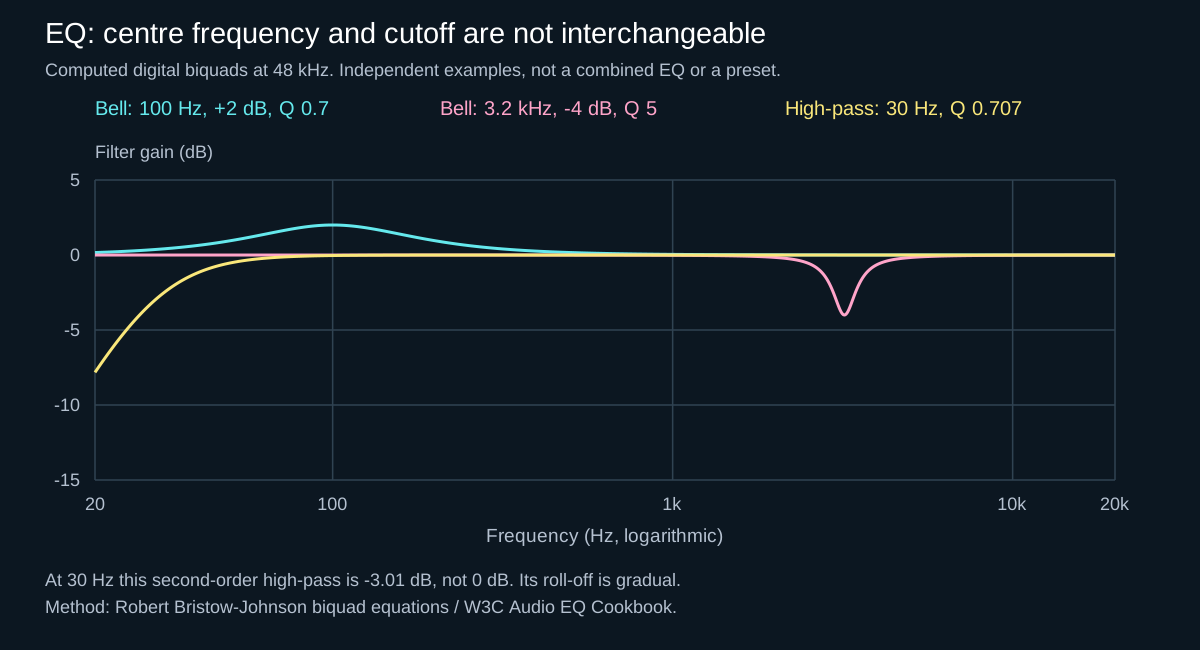
The first illustration, with two bells and a high-pass, plots filter gain in dB, not the audio’s level in dBFS. Its three curves are independent examples, not three bands of a suggested preset. The blue bell adds 2 dB at 100 Hz; that does not mean the resulting audio peaks at +2 dBFS. The pink bell removes 4 dB at 3.2 kHz and also changes neighbouring frequencies within its finite bandwidth.
The illustrated second-order high-pass, with Q approximately 0.707, is about −3.01 dB at its 30 Hz cutoff. A steady sine at that frequency retains about 0.707 of its input amplitude, not zero. Those values describe this calculated response at 48 kHz, not a recommendation to high-pass a kick at 30 Hz. Other shapes and resonant Q settings can have different gain at their labelled cutoff.
Why the manuals do not give interchangeable Q numbers: the W3C/RBJ document defines Q for specific mathematical filters. FabFilter documents its own bandwidth convention and optional Gain-Q interaction; Ableton provides Adaptive Q, which changes bandwidth as gain changes. These are different operating definitions, not evidence that one graph is wrong. When comparing EQs, keep such options fixed and compare the response and sound rather than the knob label alone.
Choose a filter by the job
Use a bell when a focused region needs changing, a shelf when the whole low or high side needs tilting, and a cut filter to attenuate unwanted content beyond a cutoff. A normal high-pass or low-pass does not remove everything immediately at that frequency; attenuation follows its slope and response. A notch is specialised: it removes a very narrow region. Ableton EQ Eight and FabFilter Pro-Q both expose these shapes, but the useful choice comes from the sound—not the brand of EQ.
Corrective EQ or a creative filter sweep?
A persistent ring may need a focused bell cut; a breakdown that should lose weight before the drop is a different job. Moving a high-pass cutoff can deliberately thin that phrase, while a low-pass sweep can darken it. EQ can also be automated: the distinction is the musical purpose, not a rule that EQ stays still and filters move. Ableton’s Auto Filter reference explains cutoff, resonance and modulation; the static curves above do not represent a moving filter’s whole output.
For the transition task, JDMeet Filter is a free filter-and-transition VST3 for Mac. Its CUT module offers high-pass, low-pass, band-pass and notch recipes, while Intensity can also move other active effect layers. It is not a substitute for independently setting a parametric bell’s frequency, gain and Q. AIR adds input-following filtered noise, not a high-shelf boost; RISE adds tonal layers. Do not attribute all of a preset’s brightness to its filter curve.
Try one controlled transition: start playback with Intensity at zero, keep CUT active and disable ECHO, SPACE, AIR, BEND, RISE, JET and PULSE. Automate a short Intensity ramp on the chosen channel, then return it to zero before the drop. Listen for the first kick’s restored weight and any lingering effect; adjust the return timing to the phrase. Add other modules one at a time only after the sweep works. Compare at comfortable, similar loudness in the full mix. This is a listening exercise, not a measured response or a universal automation preset.
Masking is a relationship problem
Two sounds can be strong alone and unclear together because energy from one makes detail in the other harder to hear. In hard techno, the obvious case is kick against rumble or bass, but distorted percussion and vocals can also crowd the same presence region. A spectrum collision display can point to overlap; FabFilter explicitly describes collision detection as an indication rather than exact science. The red area is therefore a question to investigate, not an instruction to cut.
Before opening an EQ, change the relationship itself: audition a different kick, shorten the rumble, move a bass note, alter an octave, or reduce a layer. iZotope recommends considering sound selection and arrangement before corrective unmasking. That matters in dense hard music because carving every element can leave a clean spectrum with no authority.
Cut, boost—or move another sound?
A cut is not automatically more professional than a boost. Cutting the rumble where the kick communicates its pitch can create space; boosting the kick at the same point may only make the combined low end larger. Conversely, a broad boost can give a dull source the tone it never had. Decide which element owns the musical role, then adjust the smallest number of sources. Complementary EQ is useful when the ownership is stable, but dynamic level control may work better when the conflict only appears on kick hits.
Use a static curve for a persistent tonal problem; consider dynamic control or automation for an event that changes. First test whether arrangement or envelope changes remove the conflict.
A controlled kick/rumble experiment
Suppose the kick becomes unclear when a rumble enters. Use a fixed audio phrase containing both an exposed kick and the dense overlap. This is a test for your session, not a claimed measurement or a promise that EQ is the solution. Keep the monitor level comfortable and save the unprocessed balance before making changes.
- Make the diagnosis audible. Mute and restore the rumble. If the kick is still unclear alone, investigate the kick itself rather than carving the rumble automatically. Write down whether you are losing the click, body or distinction between consecutive hits.
- Save an envelope alternative. From the reference, shorten or reshape only the rumble’s decay. Leave EQ unchanged and retain that version as a separate candidate. Listen for restored separation and for unwanted gaps.
- Save an EQ alternative. Return to the original envelope. On the rumble, use one static bell to investigate the overlapping region. If a temporary boost helps locate it, monitor quietly and reset gain before deciding on a cut. Keep processing mode and adaptive-Q options unchanged; avoid changing several bands at once. Adjust the final bandwidth by ear so the rumble keeps its role between kicks.
- Compare fairly. Match the apparent loudness of the candidate mixes using clean gain after the comparison path. A downstream clipper or limiter can react differently to each EQ move, so first compare before that nonlinear stage, then restore it for a separate full-chain check. The gain-staging guide explains why input drive cannot substitute for output matching.
- Keep the useful trade-off. Alternate the same phrase without watching the curves. Can you follow the kick when the rumble enters? Does the rumble keep its note and sustain elsewhere? Check a different bass note, the fill and quiet playback. Keep the simplest candidate that solves the named problem without an unacceptable loss of weight.
If a static cut solves the overlap but makes the exposed rumble thin, compare dynamic EQ or automation as a separate candidate. If the problem is level cancellation rather than masking, a phase and polarity check may reveal more than further carving. These tests distinguish possible causes; none proves a universal frequency split for every kick and bass.
Starting points, not presets
For a resonant kick tail, begin with a narrow bell and sweep to identify the ring, then widen it until the cut sounds natural. For broad boxiness, begin with a lower-Q bell and a small reduction. For hats that dominate the groove, compare a gentle high shelf with a focused bell. These are search strategies—not universal frequencies or gain values.
Make the smallest move that solves a clearly heard problem. If bypassing the EQ does not reveal a useful improvement at matched level, delete the band.
What the analyzer can and cannot do
An analyzer shows energy distribution and helps track changing resonances, but it cannot decide whether distortion, weight or brightness belongs in the record. Ableton documents that EQ Eight can display the output spectrum behind its curves. FabFilter adds pre-, post- and external-spectrum views; its resolution, speed and tilt settings also change what the graph appears to show. Use consistent analyzer settings when comparing signals and remember that a visible peak may be the character of the sound.
Phase and stereo checks
Ordinary minimum-phase EQ changes phase around its filters; steeper filters and larger moves make the interaction more consequential. That does not make minimum-phase EQ wrong—it is the normal, low-latency choice for most mixing. Linear-phase processing trades that behaviour for latency and can introduce pre-ringing, so it is not an automatic upgrade for transient-heavy kicks. Compare modes only when a real problem demands it.
Ableton EQ Eight supports Stereo, Left/Right and Mid/Side processing, while Pro-Q can place individual bands in left, right, mid or side channels. M/S EQ can reduce harsh wide information without hollowing the centre, but aggressive side filtering can change width and translation. Always recheck mono after a stereo-specific move. In a conventional M/S matrix, M = (L + R) / 2 and S = (L − R) / 2: summing to mono removes Side information. Side EQ alone cannot recreate a missing centre.
Failure modes to catch early
- Sweeping with a huge boost and keeping the result: the search technique exaggerates almost every frequency into sounding problematic. Reset gain before deciding.
- High-passing every channel: filters can remove useful weight and accumulate phase shifts. Filter because content is unwanted, not because a template says so.
- Mixing with eyes only: smooth curves and separated spectrums do not guarantee a coherent record.
- Ignoring level: a boosted signal often wins the comparison because it is louder, while a cut signal can seem smaller even when clearer.
Check the model separately from the mix
To reproduce the illustrations exactly, evaluate the RBJ equations at each graph’s labelled sample rate, frequency, gain and Q. Test one filter at a time; adding the three responses would produce a different curve. Our numerical checks verify the bell centres, high-pass cutoff and Q-only comparison, and compare the rendered graph coordinates with those calculations.
To investigate an actual plug-in, use a transfer-function analyzer or compare the same steady test signal before and after the filter, leaving monitoring muted or quiet. Read the difference in level after the response has settled, not an isolated output-spectrum height. Disable auto gain, dynamic bands and coloration for that comparison. A different Q convention or near-Nyquist response can explain a mismatch with the teaching model; do not label it a fault without checking the processor’s documented design. This measurement test does not tell you which EQ setting suits the music.