Start with the collision, not a preset
A kick-triggered compressor turns the kick envelope into gain movement on the bass, rumble or music bus. That does not mean maximum ducking is better. First decide what needs space: the click, the low-frequency body, or the entire kick tail. If the problem is an arrangement overlap or cancellation, start with the kick-and-bass diagnostic guide; this page focuses on a gain-control process you actually intend to use.
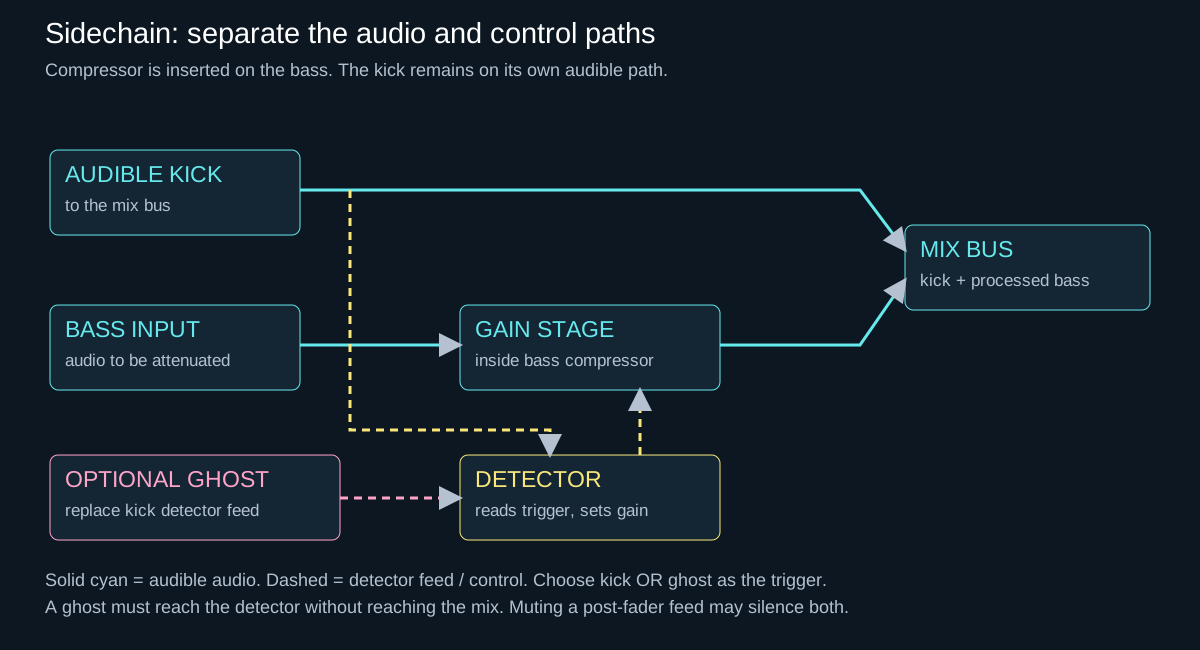
There are three separate jobs: the audible kick reaches the mix, a detector feed asks for attenuation, and a gain stage changes the bass. The following original diagram is a routing explanation, not a screenshot of a DAW or a measured session.
Route a clean trigger
- Place the compressor on what must move. Usually that is the bass or rumble, not the kick.
- Select the kick as the external sidechain. The kick controls the detector but is not added to the compressor output.
- Audition the detector. Ableton and FabFilter both provide a listening mode. Confirm that each wanted kick triggers clearly and that hats or distortion tails do not cause extra movement.
- Use a ghost trigger when the audible kick is too complex. A separate short pulse can create predictable ducking. Disable its audible output while preserving the detector send. Muting a track or lowering its fader can also silence a post-fader sidechain; check the selected tap point and audition the detector.
Set up sidechain compression in Ableton Live
In Live 12, put Compressor on the bass track. Open its sidechain section, enable Sidechain and choose the kick in Audio From. Select the intended tap point: a feed taken before effects will not include the kick processing that follows it. Use the sidechain headphones to confirm the source, then switch listening mode off.
For a clear routing test, use the external detector alone and a fully wet processed output. The sidechain Dry/Wet blends detector sources; Compressor’s main Dry/Wet blends audible dry and processed audio. They are not interchangeable. Adjust threshold and ratio until each kick visibly causes gain reduction on the bass, then reduce the effect to fit the track. See the official Live sidechain controls.
Set up sidechain compression in FL Studio
Keep kick and bass on separate Mixer inserts, with Fruity Limiter on the bass. The detector connection must run from kick to bass—not the other way round.
- Select the kick insert. At the bass insert, right-click the send switch and choose Sidechain to this track. Keep the audible kick routed to the Master. The option ending in “only” also removes other output routing; do not choose it accidentally.
- Open Fruity Limiter on the bass, select COMP, then right-click its SIDECHAIN selector and choose the kick insert. An empty list usually means the Mixer connection is missing.
- Increase ratio above unity and lower threshold until the bass ducks on the kick. For compressor-only diagnosis, Image-Line specifies maximum CEIL and zero LIMIT-section ATT; COMP attack is separate. Check that gate and saturation are not changing the comparison.
Fruity Limiter’s SUSTAIN controls an RMS averaging interval, not a simple hold after a trigger. Consult Image-Line’s Fruity Limiter manual when translating settings from another compressor.
Do not translate control names literally. Image-Line separates COMP attack from LIMIT lookahead and lets CURVE change the envelope shape. Pro-C 3’s timing documentation instead describes a separate Hold and style-dependent recovery, with Auto Release adding further program dependence. A matching millisecond display does not establish a matching gain envelope. Compare the return of the bass, not the labels.
Prove the routing before tuning the sound
Try this in a temporary copy of a loop, not by overwriting your arrangement. Keep a sustained bass note and remove one kick event. With kick-only external detection, the bass should recover through that gap according to the compressor’s timing. If ducking continues on every beat, look for a ghost trigger, another detector source or separate volume automation. Restore the kick event before judging the groove. This is a diagnostic exercise, not a measured test result.
Attack: decide what gets through
For bass ducking, a fast attack usually opens space near the front of the kick. But “fast” is not a universal number: an attack that is too abrupt can reshape a low waveform and introduce distortion. FabFilter notes that bass is especially sensitive when timing becomes fast enough for the compressor to follow individual waveform cycles. Begin fast enough to separate the collision, then adjust while listening to the bass onset and the combined groove. This compressor is changing the bass, not the audible kick; a faster bass attack setting does not directly compress the kick transient.
Release: return on the groove
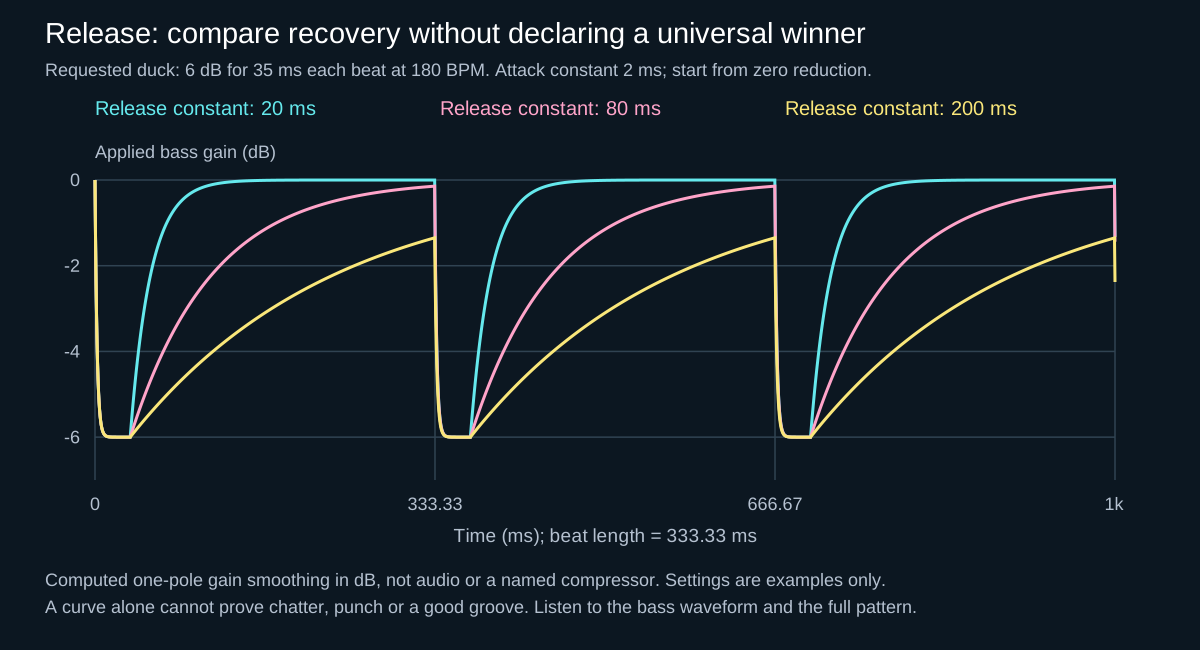
Release controls how quickly attenuation recovers when the detector asks for less of it. The total duck also depends on the trigger envelope, threshold, attack and any hold. At 180 BPM, a quarter note lasts about 333 ms and a sixteenth note about 83 ms; those are timing references, not recommended settings. Setting release to 83 ms does not guarantee that the whole duck lasts one sixteenth note.
As a starting test, listen for recovery into the next important bass note. Full recovery before every kick is not compulsory: sustained reduction can be intentional. Listen for a hole that lasts too long, a late bass swell or audible flutter. Compare a shorter detector pulse with a shorter release separately; either can change the gap, but they do different jobs.
A worked example: the trigger is still asking for a duck
Imagine the next bass note starts a sixteenth note after the kick. At 180 BPM that is 60,000 / 180 / 4 = 83.33 ms. A detector that still requests strong attenuation then can bury that note even with a short release. The note position is a musical reference, not a release prescription.
The table uses one isolated rectangular request for 6 dB of reduction, a 2 ms attack constant and exponential smoothing in dB. Before the request ends at time T, reduction is 6 × (1 − exp(−t / 2)). Afterwards it is reduction(T) × exp(−(t − T) / τ). Every time is in milliseconds. Here τ is a declared mathematical constant, not the definition of a real compressor’s Release knob. There is no audio detector, knee, hold, lookahead, gain compensation or second trigger in this calculation.
| Comparison | Request T | Release τ | Next 1/16 83.33 ms | Next 1/8 166.67 ms | Before next beat 333.33 ms |
|---|---|---|---|---|---|
| Short request / slower recovery | 35 ms | 80 ms | 3.28 dB | 1.16 dB | 0.14 dB |
| Long request / same recovery | 120 ms | 80 ms | 6.00 dB | 3.35 dB | 0.42 dB |
| Long request / faster recovery | 120 ms | 40 ms | 6.00 dB | 1.87 dB | 0.03 dB |
| Short request / faster recovery | 35 ms | 40 ms | 1.79 dB | 0.22 dB | 0.00 dB |
Compare the two long-request rows first: both still ask for the same reduction when the sixteenth-note bass arrives, so changing release does nothing at that moment. Compare the two 80 ms-release rows next: the shorter request allows recovery to start sooner. A displayed 0.00 after rounding is not exact zero in this exponential model. These calculations cannot tell you which version has more punch or whether a real bass waveform distorts.
The earlier plot answers a different question: three release constants with the same repeated 35 ms request at 180 BPM. Its vertical axis is applied gain below zero; this table reports the positive amount of reduction. Neither illustration is a captured plugin response. Keep those differences in mind when comparing them.
Threshold, ratio and range
For basic hard-knee downward compression, threshold sets the detector level above which attenuation is requested; a soft knee can start below that point. Ratio sets the steady-state compression slope, not the transient response by itself. Set both while watching the full pattern, not one isolated hit. If the plug-in provides a range control, cap the maximum attenuation so a loud kick accent cannot remove the bass completely. The useful question is not “how many decibels?” but “is the kick readable while the bass still feels continuous?”
Filter the detector when needed
If a full drum bus is the trigger, use the sidechain EQ to focus the detector on the kick region. Ableton explicitly recommends its sidechain EQ and listen mode for isolating the kick from a mixed drum track. Tune until the detector responds consistently to the kick without following hats or claps. Do not copy a cutoff frequency: it depends on the source.
Detector EQ is not frequency-selective ducking. A low-pass filter in a broadband compressor’s sidechain changes which frequencies trigger gain reduction; it does not make that reduction apply only to the bass frequencies. If the bass’s upper texture should stay steady while its low end moves, compare a band-limited processor using the static versus dynamic EQ guide. First check the basic kick-and-bass arrangement and sound roles; ducking cannot fix every collision.
A hard-techno check in five passes
- Loop the busiest kick-and-bass section and level-match bypass.
- Make the ducking obvious, then set attack for separation without a blunt bass onset.
- Set release by the return of the groove, not by the meter alone.
- Raise threshold, lower ratio or reduce the allowed range until movement is only as deep as necessary. Lowering threshold normally increases compression for a fixed trigger.
- Check the intro, fills and kick dropouts. Automation may be cleaner than forcing one setting to handle every arrangement state.
For a more controlled comparison, render a repeatable bass phrase and keep its input level fixed. Save three alternatives: your reference trigger, a shorter detector-only pulse with the same compressor settings, and the original trigger with a faster release. Do not shorten the audible kick during the detector test. Keep makeup/auto-gain state and wet/dry mixing fixed; use post-effect trim for the final listening match. First inspect the gain shape, then compare matched versions in the full mix. This is a proposed experiment, not a test we have performed on your session.
Four failures to distinguish
- The kick becomes silent: restore its audible routing; losing the source is not successful ducking.
- The meter never moves: prove the selected external feed reaches the detector before extreme threshold changes.
- The bass stays low after the kick: compare trigger length, averaging/hold and release separately; also inspect any other active gain automation.
- The bass changes tone or clicks: relax the transition and compare the waveform in context. A smooth-looking gain plot does not prove clean audio.
Good sidechain is heard as a stronger relationship between kick and bass—not necessarily as an obvious pumping effect.
Sources / Further Reading
Reviewed 10 September 2026. The DAW manuals establish routing and control behaviour; they do not supply a universal hard-techno preset. The original routing diagram, declared gain model and listening protocol explain separate questions. No third-party screenshot, audio measurement or expert endorsement is presented here.