What a compressor actually does
For a basic hard-knee downward compressor, the detector requests attenuation above threshold. Ratio describes the steady-state input/output slope: at 3:1, 3 dB of input increase above threshold becomes 1 dB of output increase, before make-up gain. At 1:1 the compression law applies no attenuation; gain, coloration or other stages may still act. Soft knees can begin compressing below the nominal threshold, and an external detector can respond to a different signal.
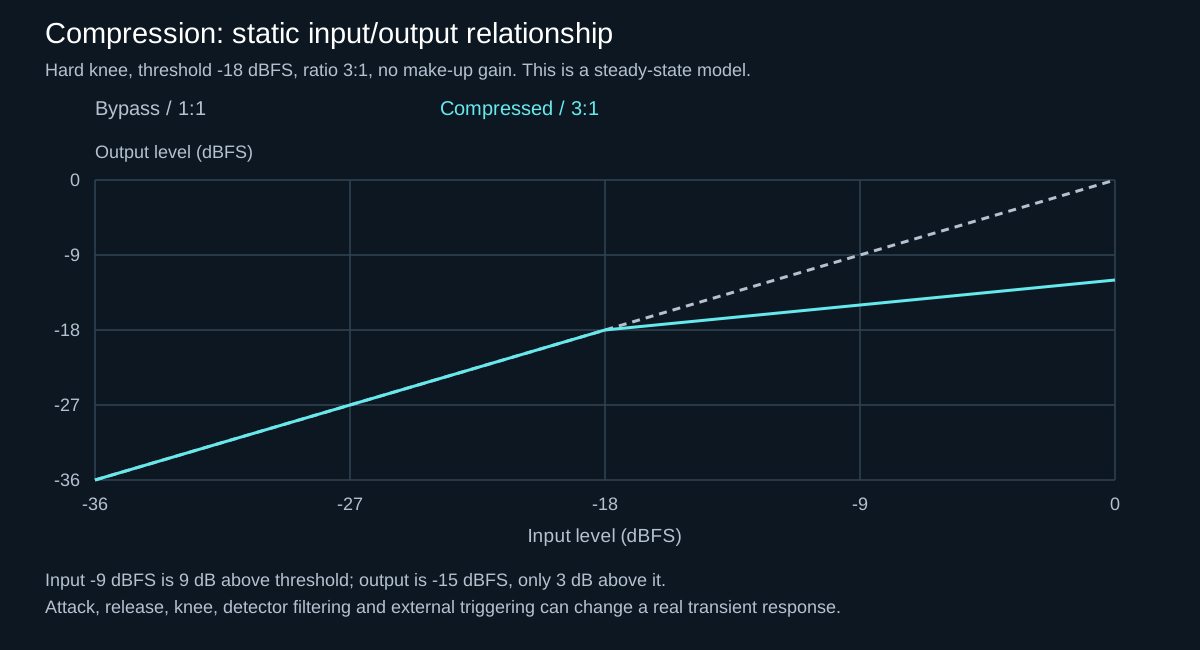
Read one point on the graph: its illustrative threshold is −18 dBFS and its ratio is 3:1. A steady detector input of −9 dBFS sits 9 dB above threshold, so the ideal output is −18 + 9 ÷ 3 = −15 dBFS: 6 dB of attenuation before make-up gain. This is a calculation, not a measured kick or a recommended recording level. A brief transient may finish before the gain settles; the transfer graph does not predict its peak by itself.
Knee and range define the transition
A hard knee moves abruptly into the chosen ratio near threshold; a soft knee introduces the change more gradually. Neither is automatically aggressive or transparent because attack, release and programme material still determine the envelope you hear. If the compressor provides a range control, use it to cap maximum gain reduction: this can stabilise a bus without allowing an unusually loud kick to pull the entire groove down.
Attack shapes the front
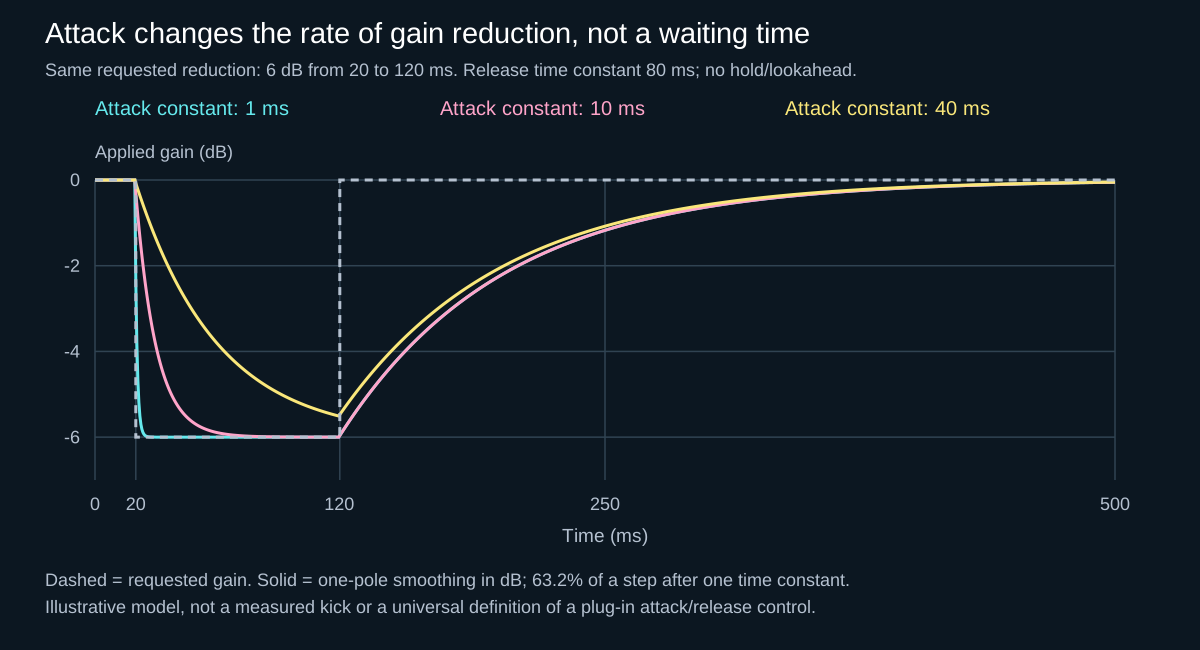
Attack controls how quickly attenuation develops when the detector asks for more reduction. It is not a period of silence before compression starts, nor a universal time to reach the final value. Manufacturers use different timing conventions, curves and program dependence. A slower attack can let the initial click or punch pass before the body is controlled. A faster attack catches more of the front edge, but can make a kick feel blunt or add distortion when pushed too far. At 180 BPM, do not choose attack from a chart: loop the busiest pattern and listen to the space between hits.
Release shapes the recovery
Release controls recovery when the detector asks for less attenuation. Recovery can begin while the signal remains above threshold; it need not reach zero reduction before every hit. Some compressors add hold or automatic, program-dependent recovery. If it releases too slowly, the next kick can arrive while gain reduction is still active. If it releases too quickly, the level may flutter or audibly pump. Pumping can be intentional, but it should reinforce the rhythm rather than randomly resize consecutive hits.
The detector hears a different mix
Peak detection responds closely to short excursions; RMS-style detection averages energy for longer and can ignore some brief peaks. This is not simply “technical” versus “musical.” A clipped hardcore kick may have a small peak-to-body difference, while a sharp percussion layer may trigger a peak detector long before it feels loud. Choose the detector from the behaviour you need.
Side-chain filtering changes what controls the compressor without necessarily filtering the audible signal. On a drum or mix bus, reducing sub influence in the detector can stop every low kick from causing a broad gain dip. Check the result against the unfiltered detector: removing too much low-frequency influence can make the processor ignore the event that actually dominates headroom.
Lookahead trades overshoot for timing
A compressor cannot normally reduce a peak before detecting it. Digital lookahead delays the audible path so the detector can react earlier. Ableton documents distinct lookahead choices, while FabFilter exposes variable lookahead and notes the latency cost. More lookahead can make peak control cleaner, but it may also soften the relationship between transient and body. Treat it as a problem-solving control, not a quality switch.
A controlled kick-loop experiment
This is an experiment to perform in your own session, not a report of a listening test we have measured. Use a fixed audio loop containing a full kick, a quieter hit and a fill; print any randomised synth or sample variations first. Start at a comfortable monitor level and leave output headroom.
- Freeze the variables. Use one downward-compression style, internal peak detection and fully wet output. Turn off automatic threshold, release and make-up gain where available. Keep knee, lookahead, detector filtering and ratio unchanged throughout each comparison. A 3:1 ratio is an illustrative starting point, not a target. Lower threshold until the change is audible without driving the output into clipping.
- Compare attack alone. Save one faster-attack state and one slower state with the same release. Use only post-compressor gain to match apparent loudness, not input gain or threshold. Alternate states on the exact same phrase. Note whether the click stays distinct, the body becomes steadier, or the kick merely gets thinner.
- Compare release alone. Keep the preferred attack and save shorter- and longer-release states. Re-match output level. Listen to the tail between hits and the first hit after the fill; watch whether gain reduction carries into it. Carry-over is not automatically wrong, but an unintended weak hit is a reason to revise the setting.
- Reduce and recheck. Raise threshold or reduce ratio, then repeat the matched-level comparison with bass and percussion playing. Keep a short note of the compressor mode, settings and audible trade-off so that the result can be repeated later.
What would change the decision? If one isolated hit is too loud, edit its clip gain before asking the compressor to reshape every hit. If the problem is only an exceptional short peak, compare clipping or limiting and their distortion trade-offs. If the bass needs to move around the kick, use the separate external-sidechain workflow. A prettier gain-reduction trace is not evidence that any of these choices sounds better.
Limits of the experiment: it compares settings inside one processor on one loop. Different detectors and program-dependent curves prevent the same millisecond labels from proving equivalent behaviour across plug-ins. Keep input drive separate from output level matching, especially around nonlinear processors.
Parallel compression is a blend, not a rescue
Adding a compressed path beneath the dry signal can retain the original transient while raising quieter body and tail information. FabFilter describes this as preserving dry dynamics while reinforcing the sound. The blend still changes tone and peak structure, and parallel paths can interact differently if plug-in latency is not compensated. Match the combined level before deciding that the denser version is better.
Hard-techno examples
On a distorted kick bus, compression may stabilise uneven bodies while leaving the click alive. On percussion, it can pull room or distortion tails forward. On a mix bus, low-frequency energy can dominate the detector and duck everything; FabFilter recommends gentle ratios and checking whether bass is driving unwanted gain reduction. Treat all numeric values as starting points, never presets.
If the compressed version only wins because it is louder, the decision is not finished.
Read the meters, then close your eyes
Gain-reduction meters show when and how much the processor works. They cannot tell you whether the groove improved. Compare in context, at equal apparent loudness, and check quiet playback: lost punch is often easier to notice when the monitor level drops.
Failure modes to catch
- Using make-up gain as persuasion: automatic gain is an estimate, not a loudness-matched test.
- Chasing a gain-reduction number: identical meter readings can describe completely different envelopes and sounds.
- Release that never resets: constant reduction can be intentional, but verify that the next hit is not arriving into an accidental level dip.
- Compressing after the transient is already destroyed: once clipping or limiting has removed contrast, a compressor cannot reconstruct the original hit.